November 26, 2011

OCC: Oh! Christmas Tree

I'm so thrilled this time of year. I love the transition from Halloween to Thanksgiving, from Thanksgiving to Christmas. It is absolutely my favorite time of the year! The family, food and fun; the sharing, the caring, the love! Reflecting in the birth of Jesus really makes me feel grateful for all that he has done for me and the whole world.

This week on Our Creative Corner, Wendy Janson is our host with a challenge to begin ringing in the holidays. As Wendy puts it, "This is the weekend I like to put up my Christmas tree and decorations.  The challenge is to make a project with a Christmas tree (or pine tree if you would rather) on it." 

I'm not much of a CAS designer but sometimes, I can pull it off well. This card fits in that category (I think) with its simplicity in color, design and reserved layout.


I first stamped the green tree and then the sentiment. 

And then I broke out my Liquid Pearls in Rouge to create a garland. Talk about easy, fun and mailable! This could be one of the easiest cards I've made in a long time and since the holidays are a huge card-giving holiday, this would be perfect to make 10...20...even 50 at once if you wanted to.

Why don't you join us this week on Our Creative Corner? Create a project with a Christmas or pine tree. Take a look at what the other designers have cooked up for their Christmas Tree projects.


I can't wait to see what your "trees" look like this week!
Holly

November 19, 2011

OCC: Photo Inspiration Challenge

Happy Saturday!

I am hosting the challenge this week at Our Creative Corner. With the Thanksgiving holiday approaching this week, I thought it'd be fun to have a photo inspiration challenge using a photo that's a little different than what our table looks like for Thanksgiving. Don't get me wrong, Thanksgiving is always nice, always fun, always great company and food but never fancy. I'd love to go "all out" like this but its beyond me. But I can still admire it, right?


So this week I made a little tag to hang on a wine bottle or sparkling cider bottle. I was inspired by the pattern on the tablecloth and the blue and orangey-gold colors. 


I used a bookmark blank that I got from JoAnn and punched a circle in the top near the flat side. The punch is about 1.25" in diameter and fits nicely on the neck of the bottle. Then I embossed the  "front" with an impression plate from Papertrey Ink that I simply adore. When I saw this photo I instantly thought about this embossing plate.

The orangey-gold ribbon is one of my favorites. Its a bit if an odd color and has a bit of shimmer so I don't get to use it a lot but it makes a wonderful bow. I used two Papertrey Ink dies for the blue behind the bow (sorta hard to see) and the doily cut out. I stamped my sentiment on another piece of plain white cardstock and used some distress ink to add some color. I topped it all off with a gold button.

So get inspired by our photo and bake up something fun for your Thanksgiving table, Holiday or New Year. It could be a card, a small gift, a wine tag or anything else paper! While you're at it, take a look at what our other designers have put together this week!


Have a great Thanksgiving holiday - enjoy some turkey, pumpkin pie and your loved ones
Holly


November 12, 2011

OCC: Pumpkin Pie

Hello all my paper crafting friends!


Thanksgiving this year has taken on a new perspective for me. See, in year's past, I would have been anxious to get right to Christmas. Skip over Thanksgiving. Its just a day of turkey and pie. But this year I'm thankful. 


Thankful for...
...my family. My husband. My son. My mom and dad. My father-in-law and mother-in-law. We've had our fair share of challenges these last few months and having them all around us is a blessing.


....my company. I love the place where I work. I love the people I get to work with and for. I get to go to work every day doing what I love and use the talents God has given me.


....my faith. I couldn't make it in this life if I didn't have God. These last few months have proved that. His grace and His truths have been the only thing some days I could hold on to.


...my country. America is blessed with freedoms like no other nation. Having been born here, I used to take it for granted but now as I grow older I can see how living here is a priviledge that our service men and women work to maintain each and everyday.


So this year, I'm happy to make a card for Thanksgiving day.  


This week, our host is Wendy Jansen. In the spirit of Thanksgiving, make a project that uses the color of Pumpkin Pie or features pumpkins.


I found the little felt leave at Cost Plus World Market. I was really proud of myself to have found something crafty at a non-craft store!


Find your pumpkin pie colored paper and pull out your pumpkin stamps and put together a project that celebrates Thanksgiving (or any other occasion you prefer). To get you inspired, take a look at what the other Our Creative Corner designers have put together along this theme.


I hope you have a great week! 
Holly


October 29, 2011

OCC: Fancy Folds

I can't believe October is days away from being over. It seems like we were just enjoying the August sun, taking a little vacation and I was drinking iced green tea. Now, today it's pouring down rain, cold and dark.

I'm ok with it though because I spent nearly all day in my craft room yesterday. I actually took the day off work on Friday so I could just do whatever I wanted and so that's what I did.

This week on Our Creative Corner, Tui Nathan is our host. She has a wonderful challenge lined up for us this week - Fancy Folds. This one really challenged me. I mean, I almost threw in the towel. I must have four half-done copies of this card in the garbage can right now. I just couldn't get it to work. And then I made one small change to my engineering and BAM! it all came together.


I'm gearing up for the holidays so everything in my craft room is Christmas right now. Glitter, jingle bells, holly leaves - even this little sledder die from Papertrey Ink. It might not look like a fancy fold card from the front but wait for it.....


I really wanted to use this 6" x 6" Christmas paper pack I have from Websters' Pages so I had to make my card a mini card to pull this off.

I started by cutting two pieces of paper, one Kraft, on patterned the same size - 6" x 2.75 - and then stamping and embossing the front.


Then I scored the patterned paper vertically three times - at 1.5", 3" 4.5" from the left hand side edge. Th.is made four evenly sized panels. 

I used a Spellbinders die to cut a small window for inside, to emphasize the fold and reveal my sentiment. I us this Post-it Tape from 3M to hold my dies in place when I need to. I like being able to keep it put while its going through my Hot Shot. The Post-it Tape is light adhesive so it doesn't leave any residue when I take it off my papers.


After I diecut, I laid my patterned paper on top of my kraft paper so I could outline the window. I wanted to make sure I stamped my images and sentiment in the right place. It's hard to see in this picture because the line is so light. I try not to push hard so nothing shows when I erase the line after stamping.


Then I stamped my sentiment on the and a few images where a little window would be cut out and put a score in the center. Then fold the patterned paper in half on the score mark and then while its still folded in half, fold the outside edge back toward the fold for the front and the back. Then I adhered the two together. When I had it together, I adhered the sledder with foam dots and corner rounded all four corners.


Challenge yourself to play along with us this week on Our Creative Corner. Create a project that uses fancy fold in some way and if you can, explain on your blog how you did it. Take a look at what the other designers have designed for this week's Fancy Fold projects.


Holly

October 22, 2011

OCC: Fabulous Faces

Happy Saturday!

Well, its raining in Washington (big surprise, I know) but that just means staying inside is a requirement. And staying inside means I will be paper crafting today! WOO HOO!

This week on Our Creative Corner, we're working on projects with faces. Marjie is the host this week and I'm glad she put this challenge together. It really made me think about how I was going to pull this one off. I love these kind of challenges!

I'm not a scrapbooker but I do love having pictures of my family around me. The one I'm using this week is one of my all-time favorites of my son, Grady when he was a baby. I turned it into a sepia toned image for this project because I really like that for the holidays. Its nostalgic and I just love that for Christmas.

So my project could be an ornament for the tree or a gift tag. Grady's four now and learning to read but still in the beginning stages. How fun would it be if we wrapped all the gifts and put pictures of the people they go to on the tag? All my nephews would have a grand time distributing the packages because they could actually hand them out without having to ask their parents, "What does this one say?"


Play along with us this week on Our Creative Corner. Create a project that uses a face in some way. (And it doesn't have to be a human face!) Take a look at what the other designers have cooked up for their Fabulous Faces projects.


October 15, 2011

OCC: Transparencies

'Morning!


I really love it when I discover new things in papercrafting. When I discovered I could stamp on transparencies, I was a little giddy. One of the really cool things about stamping on transparencies is that if you mess up, you can remove it with stamp cleaner and start over. 

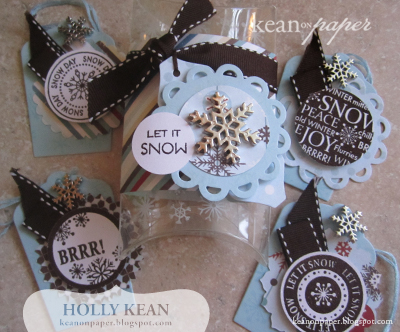
This week on Our Creative Corner we're working with transparencies. For my project, I've created a little gift tag set that is packaged in a little transparent pillow box. 


Stamping on transparency isn't as hard as I thought it would be. One tip, stamp directly onto the surface and then lift straight up. Any shifting, rocking or uneven pressure and the stamp will have a tendency to slide around on the slick surface.


And here are the tags that go inside the box.


Fun, huh?


Join us this week on Our Creative Corner by using transparency in your project. Layer, stamp, and diecut to your heart's content. Visit some of the other designers and get your ideas in motion!


Tui Nathan

I can't wait to see what you're inspired to do in your projects!

Holly

October 8, 2011

OCC: Fall Color Challenge

Good Morning! 

It's actually a sunny Fall morning in Washington - one of my most favorite things about the year. There's something really special about the cool, bright, sometimes slightly foggy mornings that make me feel alive and vibrant. Seeing Mt. Rainier lit in shades of pink and red as the sun is coming up is pretty awe-inspiring.

This week on Our Creative Corner, we're working with a color challenge from Lori and its all about Autumnal color.

Isn't it a pretty combination for fall?


I thought I'd take another run at the stamp resist technique I learned at the Inspiration Showcase online card class taught by one of my favorite paper crafters and stamper extraordinaire, Jennifer McGuire

I love this technique. It is really easy to create the color background of your choice like I've done here incorporating this week's challenge colors.


I love layering the butterfly dies and punches - they are oh so dainty and beautiful. 

So join us this week by creating a paper craft using the fall colors above as your inspiration. To get your ideas in motion, check out what the other designers have done this week with this rich palette.

Tui Nathan


Have a great week!
Holly